

How To Repair Old Brick Foundation

Although brick is known for its immovability, you may have to bust out the supplies for some DIYable fixes every now and then.
Well-nigh oft, this manifests itself in the demand to prepare the mortar that holds the bricks together, which can crack, recede, and fall out of the joints over fourth dimension. If you lot don't take care of this, the wall tin somewhen plummet and nosotros certainly don't want that. It's time to chisel out the erstwhile stuff and patch information technology up with fresh mortar and while this is a pretty easy job, it has to exist done with care – and the right tools. So today, we will walk yous through the steps of repairing the mortar in your brick wall, a process formally called repointing.
How to Pick the Best Mortar for Your Brick Wall
The historic period of your brick home is the deciding cistron in what type of mortar to buy and utilize to repoint your wall. If your brick is fifty years onetime or younger, yous tin safely repair it with standard, cement-based mortar. Just, if your house was built before Globe War Ii, the mortar is probable a mix of lime putty and sand, designed for historic brick structures and you volition have to lucifer it. If non, the soft, one-time bricks will swell and shrink against the hard, new mortar which will cause the bricks to pause and autumn out of the wall over time. Lime mortar acts equally more of a absorber, flexing with the brick as it absorbs moisture then releases it.
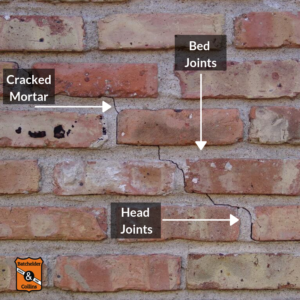
Step 1: Clear Out the Bed Joints
With your safety mask and goggles on, use either a hammer and common cold chisel or utility chisel to remove the old mortar in the horizontal (bed) joints. You'll want to avoid using electrical angle grinders, which nosotros can almost guarantee will result in disfigured bricks, unless you lot are properly trained.
The amount of mortar to scrape out is dependent upon how deep the damaged mortar goes. Scrape out at to the lowest degree ¾ inch.
Stride 2: Clear Out the Head Joints
After removing the bed-joint mortar, dig out the vertical (head) joints. Be wary not to striking the edges of the brick above or below.
Step three: Make clean Down the Wall
Now you'll want to brush away the crumbly droppings that clearing the joints left behind using a stiff-bristled castor. Then mist the wall with a hose until the brick is thoroughly damp and the water starts to drip off. This is specially of import because dry out brick will suck the moisture out of the new mortar, preventing it from curing correctly. Wait 24 hours earlier you lot kickoff filling the joints.
Footstep 4: Mix the Mortar
Before y'all start filling the joints, check the bract of your tuck-pointing trowel (the tool you lot volition use to fill the joints with fresh mortar) to make certain it fits into the joints. If the blade is too wide, grind it down using an annoying bike.
Following the directions on the bag of mortar, gradually stir water into the dry mix until information technology reaches the consistency of peanut butter and clings to the trowel when you hold it upside downwardly. Allow the mortar to balance for ten-fifteen minutes until a film of water forms on the top of the mix. Stir the water back into the mix before you start. The mortar is at present ready for utilize and remains workable for viii hours; if information technology gets too dry during that time, you can add together a fleck of water occasionally.
Pace 5: Fill the Joints with Mortar
Load mortar onto a brick trowel, concord the trowel up to the horizontal joint close to the brick and push the mortar into the joint using the tuck-pointing trowel. Sweep about ¼ inch slivers of mortar into the crenel at a time, filling the horizontal joints get-go.
Hither are some additional tips to help you in filling mortar joints:
- Pack the mortar tightly by passing the trowel's edge beyond the mortar a few times to eliminate voids then add together more mortar until the joint is filled. This will result in the strongest, nearly water-resistant joints possible.
- Fill deeper joints (¾ inches or greater) in 2 stages, assuasive the first layer to harden earlier adding the second layer.
- Once you lot've finished three or four courses of bed joints, now get through and fill up the head joints. Smooth and compact all the mortar with the trowel's flat face.
- As y'all're going, avoid getting mortar on the brick face up only whatsoever backlog mortar can exist wiped away with a mortar brush.
- The weather has a huge impact on this procedure: don't piece of work in temperatures below 40⁰F. In hot atmospheric condition, start repointing in shaded areas start so the sun doesn't dry out the mortar too fast. And only mix the mortar in small batches every bit you go.
Step 6: Clean the Bricks with a Brush
Using a soft-bristled castor, remove the excess mortar clusters that have formed on the brick face up before they harden and sweep away loose mortar from the finished joints. Brush diagonally and so that you are not disturbing the fresh mortar.
For the adjacent two days, mist the new mortar twice a day with a mitt pump sprayer or lite mist setting on a garden hose to aid it dry properly. Use a tarp to protect the new mortar from the lord's day, air current, or harsh rain.
At present step dorsum and appreciate the new expect of your brick business firm. And call up, for all your brick needs, Batchelder & Collins has got y'all covered.
Brick, Mortar
![]()

Source: https://757brick.com/repair-mortar-between-bricks/
Posted by: terryfringlose.blogspot.com
0 Response to "How To Repair Old Brick Foundation"
Post a Comment